Google Tag Manager provides setup guides for its server container to Google Cloud Platform’s App Engine and Cloud Run. However, the server software itself is distributed as a Docker container image. By following the manual setup guide, you can run it almost anywhere in public cloud services or private data centres — even on-premises.
Simo Ahava has provided a guide on how to deploy Server-Side Google Tag Manager in AWS Elastic Beanstalk where he also mentions Elastic Container Service as an alternative solution. After spending quite a bit of time setting up server-side GTM on AWS ECS, I wanted to publish a simple IaC (infrastructure as code) template to do it.
Using my AWS CDK (Cloud Development Kit) project, which also outputs a CloudFormation template, you can deploy Server-Side Google Tag Manager in your AWS account with a couple of shell commands. You can find the code at GitHub: https://github.com/lari/server-side-gtm-on-aws-ecs-fargate/tree/v1.0
In this blog post, I will explain in a bit more detail how I’ve built the setup.
What is AWS CDK?
The AWS Cloud Development Kit (CDK) is a good choice for Infrastructure as Code (IaC) development because it provides several benefits over manual deployment. CDK automates the provisioning and management of AWS resources, making deployment faster and more efficient. This reduces the risk of manual errors and saves time. You can easily deploy multiple copies of the infrastructure in different regions or with different parameters.
Compared to writing native CloudFormation templates, CDK provides a higher-level, more abstract API that allows you to focus on the application logic. This makes it easier to write, maintain, and reuse code. With CDK, developers can use familiar programming languages like TypeScript, Python, Java, and C# to model and provision AWS resources.
What does the code do?
When running CDK commands such as cdk deploy or cdk diff, CDK synthesizes the stack(s) in app.py (as defined in cdk.json) into an AWS CloudFormation template. app.py creates an instance of ServerSideGTMFargateStack which has been defined in stacks/gtm_fargate_stack.py. That’s where most of the actual logic happens.
So what’s included?
ServerSideGTMFargateStack creates the following:
- VPC (Virtual Private Cloud, i.e. a private network) with 2 Availability Zones and NAT gateways
- Cluster in Elastic Container Service (ECS)
- GTM Tagging servers running in Load-balanced Fargate Service (in the ECS Cluster), that includes:
- A Load Balancer (AWS Application Load Balancer — ALB) in the public subnets with
- A target group of the tagging server instances in the private subnets with auto-scaling based on CPU utilization and max/min task count configs
- GTM Preview server running in Fargate service (single instance) in the private subnets, attached to the same load balancer as the tagging service (using port 444)
- SSL Certificate which is added to the load balancer (if the domain is hosted in AWS Route 53)
- Basic CloudWatch metrics and logging that AWS creates automatically for ECS
- SSL Certificate (if using AWS name servers)
The domain name should be configured manually before deployment.
Here’s a simple architecture diagram of the stack:

Elastic Container Service and Fargate
Elastic Container Service (ECS) allows you to run and manage Docker containers on a cluster of Amazon Elastic Compute Cloud (EC2) instances. With ECS, you can easily scale your application up or down, update your application to a new version, or roll back to a previous version.
Fargate, on the other hand, is a serverless compute engine for containers. Fargate eliminates the need for users to manage the underlying EC2 instances and takes care of tasks such as server provisioning, capacity management, and security patching. This makes Fargate a good choice for users who want to focus on building and deploying their applications without worrying about managing the underlying infrastructure.
Additionally, Fargate’s serverless approach makes it easier to scale up or down and pay only for the resources used, providing cost benefits over EC2 for applications with variable or unpredictable workloads. Fargate is a good choice for users who want a simpler and more cost-effective solution for deploying containerized web services, while EC2 provides a more flexible and customizable virtual machine environment.
What’s NOT included?
- There aren’t any cool monitoring dashboards
- You can find the default metrics in AWS Console but in a production setup, it would be very useful to have a single dashboard that has all the important metrics in one place.
- You will not get automatic alerts (e.g. Slack) in case of issues
- You can configure Alerts for CloudWatch Metrics and send them to e.g. Slack the AWS Chatbot service. It’s quite simple to set up but not included in this project.
- Access logs (from the load balancer) are not stored anywhere
- ALB can be configured to store access logs in an S3 bucket. These can then be queried in Athena with SQL.
- Google Cloud credentials
- In case you want to use the BigQuery or Firestore APIs, you need to add the credentials to the container. You can add the credentials file in the
dockerfolder and modify theDockerfileto include it in the image. Then you need to define theGOOGLE_APPLICATION_CREDENTIALSandGOOGLE_CLOUD_PROJECTenvironment variables as explained in the manual setup guide.
- In case you want to use the BigQuery or Firestore APIs, you need to add the credentials to the container. You can add the credentials file in the
- And probably many other things that would be useful for a production setup…
What will it cost?
The cost will of course depend on multiple factors, such as the amount of traffic/events, but a minimal setup with 1 tagging server and a preview server running in the AWS Ireland region (eu-west-1) seems to cost approximately $3.5 per day so about $110 per month.
Here’s a breakdown of a single day’s cost by service and usage type:
| Service | Usage type | Cost |
|---|---|---|
| Total costs | $3.52 | |
| EC2-Other | Total | $2.32 |
| EU-NatGateway-Hours | $2.30 | |
| EU-NatGateway-Bytes | $0.02 | |
| EC2-ELB | Total | $0.60 |
| EU-LoadBalancerUsage | $0.60 | |
| Elastic Container Service | Total | $0.59 |
| EU-Fargate-vCPU-Hours:perCPU | $0.49 | |
| EU-Fargate-GB-Hours | $0.11 |
I’ve seen a similar setup in GCP Cloud Run cost about $1.54 per day, so it seems that AWS ECS is not the lowest cost option for a very small setup. However, looking at how the cost breaks down, many line items will not increase linearly with the traffic. For example, the biggest line item (EC2-Other) is related to NAT Gateways (i.e. networking) and is not part of the compute cost from running the actual tagging servers. It’s also worth noticing that having 2 availability zones doubles the base cost (hours) of NAT Gateways, for example.
I have already done some cost optimization by using the same load balancer for both the tagging servers (in port 443) and the preview server (in port 444). If the preview server had its own load balancer, the EC2-ELB base cost would be double.
AWS ELB requires at least two availability zones, so unfortunately it’s not possible to have a “less available” setup to reduce some costs. You can configure the number of NAT Gateways to be lower than the number of availability zones. But be aware you may be charged for cross-AZ data traffic instead.
There might also be other costs that don’t show up in the daily reporting. E.g. domain names, Hosted Zones (name servers), logging etc.
Deployment
Now that we know what’s included, let’s look at how to deploy the stack in your AWS account.
1. Prerequisites
AWS Account
I’m assuming that you already have an AWS account. If not, you should create one.
Custom domain name
To use HTTPS (and that’s kind of compulsory in 2023), you need a custom domain name. The recommended way is to use AWS name servers with the domain (you can do this for the subdomain if your main domain is already hosted elsewhere). However, it is also possible to use external name servers and configure the DNS records manually.
Python 3
The project has been built with Python and the AWS CDK Python SDK.
Git
You need to have Git installed to clone the repository. MacOS and Linux systems usually have it installed by default. https://git-scm.com/
AWC CLI
You should have the AWS Command Line Interface installed and configured with credentials.
GTM Server Container
Well, this is quite obvious. You need to copy the “Container Configuration” string from GTM under Admin > Container Settings.
2. Checkout code and install dependencies
Open a terminal window on your computer, navigate to a directory you want to download the code to, and clone the repository:
1
2
$ git clone https://github.com/lari/server-side-gtm-on-aws-ecs-fargate.git
$ cd server-side-gtm-on-aws-ecs-fargate
Activate your virtualenv
On MacOS and Linux:
1
$ source .venv/bin/activate
If you are a Windows platform, you would activate the virtualenv like this:
1
% .venv\Scripts\activate.bat
Install the required Python dependencies
1
$ pip install -r requirements.txt
3. A: Set up a domain in AWS Route 53 (recommended)
If you haven’t hosted your domain in AWS yet, I recommend doing that. If you want to keep your main domain elsewhere, you can still define separate name servers for your subdomain.
In the AWS web console, navigate to Route 53 > Hosted Zones and create a new hosted zone for your domain. The type should be “Public hosted zone”. If you’re using a subdomain (e.g. gtm.larihaataja.com) the Hosted Zone can be either for the main domain (e.g. larihaataja.com) or for the subdomain. You will see a list of name servers that AWS provides to you under the NS record. Add these name servers to your domain registrar, or for a subdomain, create an NS record with your external name server provider.
3. B: Create a Certificate for your domain (if not using Route 53)
Skip this step if your domain is hosted on AWS Route 53!
If you don’t create a Hosted Zone for your domain in Route 53, you need to create or upload an SSL Certificate manually in AWS Certificate Manager. I recommend creating it in AWS so it gets renewed automatically.
In the AWS web console, navigate to Certificate Manager and Request a public certificate. For the domain name, add the domain/subdomain that will be used by the GTM endpoint. For the validation method, I recommend using DNS validation. Keep the key algorithm as the default option. After requesting the certificate, you will see a CNAME record that needs to be created in your external name servers so that AWS can validate the domain ownership and issue the certificate.
4. Configure the stack
To configure the stack, you need to edit the configuration parameters in cdk.json file or add them as command line variables when running the cdk deploy command.
The variables are:
cpu: CPU per instance. The default is 256 (0,25 vCPU). For a high-traffic site, I recommend using at least 512 (0,5 vCPU).mem: Memory per instance. The default is 512 (MiB). The memory usage is quite low so I recommend choosing the lowest available option for the CPU. You can find different options in the AWS Fargate developer guide.desiredNodeCount: Default number of server instances to be running. The default value is 1. I recommend having at least 2 in a production environment.taskMinCapacityandtaskMaxCapacity: The minimum and maximum number of server instances to run based on auto-scaling. The default value is 1-2.targetCpuUtilization: The level of average CPU utilization, above which ECS will start to deploy new servers. The default value is 80%. The recommended value depends on how much your site’s traffic fluctuates. If you often experience sudden traffic spikes, you might want to have this at a lower level.containerConfig: The GTM Server container config string that you need to get from the GTM admin settings.domain: The domain name to use. E.g.gtm.larihaataja.com.hostedZoneId: The ID of the hosted zone under which your domain is hosted on Route 53. You can find this ID from the Hosted Zone details in the AWS web console. If you use external name servers, leave thisnull.hostedZoneName: The domain name for the hosted zone. If you use external name servers, leave thisnull.certificateArn: The ARN of the certificate in AWS Certificate Manager when using external name servers. You can find this in the certificate details in the AWS web console. If you use Route 53, leave thisnull.natGateways: The number of NAT Gateways to create in the VPC. You can set this number lower than the number of Availability Zones in your VPC in order to save on NAT cost. Be aware you may be charged for cross-AZ data traffic instead. The default is 2.
5. Deploy the stack
We should now be able to deploy the stack in your AWS account with the following commands. Make sure to add your AWS account id and region in the CDK_DEFAULT_ACCOUNT and CDK_DEFAULT_REGION environment variables.
If using Route 53:
1
2
3
4
5
6
7
8
9
$ CDK_DEFAULT_ACCOUNT='0123456789' CDK_DEFAULT_REGION='eu-west-1' cdk deploy \
    -c cpu=512 \
    -c mem=1024 \
    -c desiredNodeCount=3 \
    -c tasMinCapacity=3 \
    -c taskMaxCapacity=6 \
    -c domain=gtm.mydomain.com \
    -c hostedZoneId=ASDFGHJK123 \
    -c hostedZoneName=mydomain.com
If using external name servers:
1
2
3
4
5
6
7
8
$ CDK_DEFAULT_ACCOUNT='0123456789' CDK_DEFAULT_REGION='eu-west-1' cdk deploy \
    -c cpu=512 \
    -c mem=1024 \
    -c desiredNodeCount=3 \
    -c tasMinCapacity=3 \
    -c taskMaxCapacity=6 \
    -c domain=gtm.mydomain.com \
    -c certificateArn=arn:aws:acm:eu-west-1:0123456789:certificate/aaaaaaaa-0000-1111-2222-asdfasdfasdf
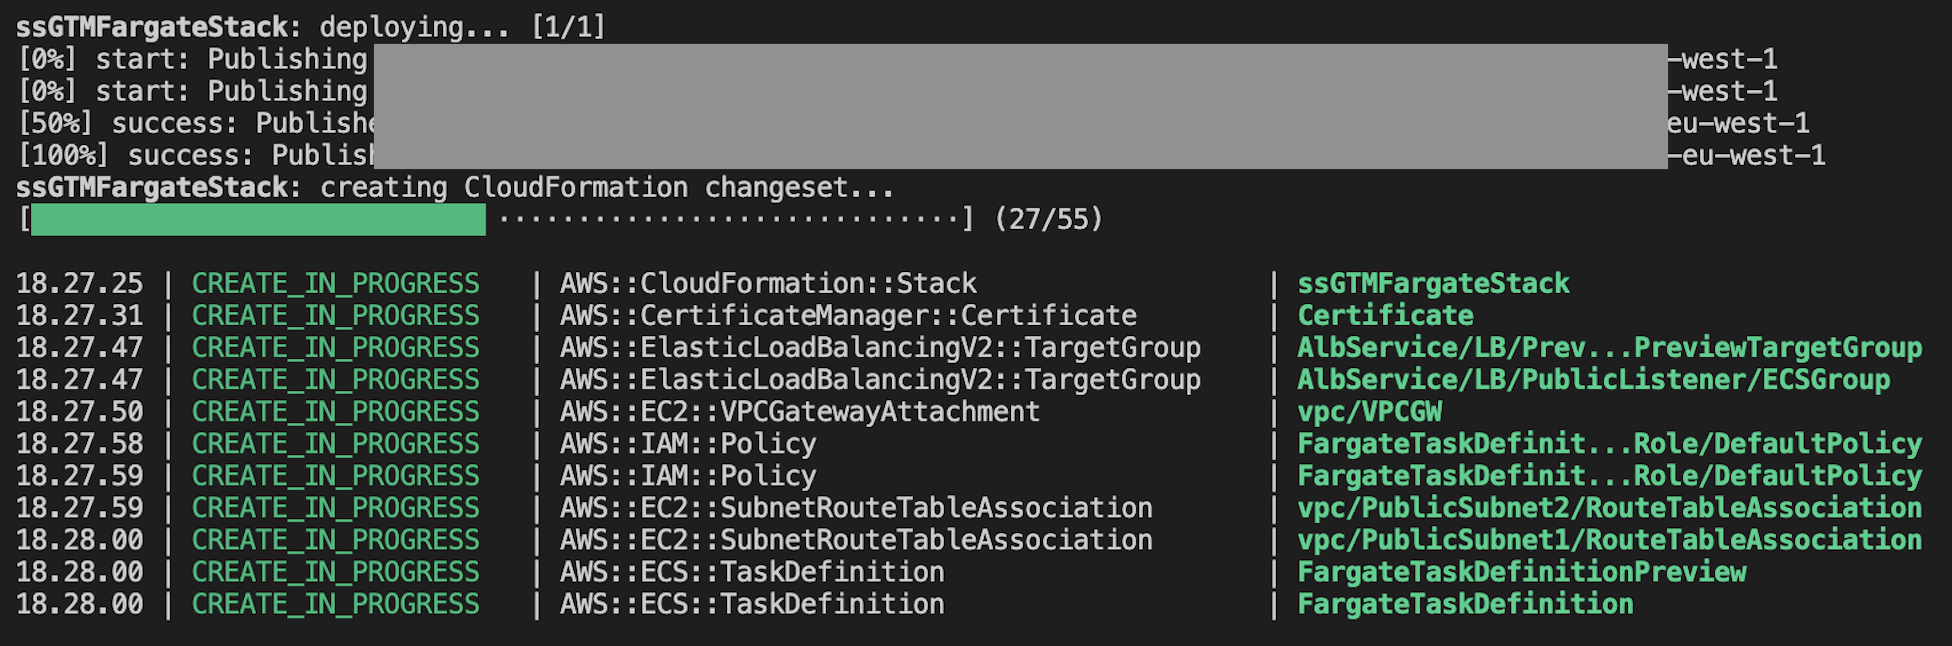
CDK will first “build” the stack and create a CloudFormation changeset. It will then display a message about things that will change and ask if you wish to continue with the deployment. You can use --require-approval never flag to skip the confirmation. This is useful if you’re automating the deployment in a CI/CD workflow.
You can follow the progress in the terminal window or open CloudFormation in the AWS web console.
Once the deployment is finished, CDK will output the load balancer DNS name (AWS-issued domain) and the service URL. If you use external name servers, you need to create a CNAME record to your subdomain with the xxx.amazonaws.com domain as value.

6. Test that it works
Once the deployment has finished, you can test if the servers work by opening the /healthz path of your GTM domain in a browser. E.g. https://gtm.larihaataja.com/healthz. You should see “ok”.
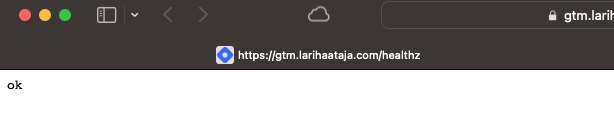
To verify that the debug server also works, you can just add the port 444 to the URL and you should see the same “ok” message. E.g. https://gtm.larihaataja.com:444/healthz
7. Update GTM Container Settings
You can now add the domain to your GTM Server Container’s settings and try the Preview / Debug mode.
8. Take it into use
Once you have verified that the server container works, you can start sending data to it. This can be done in many ways. You can define the server-side endpoint for GA4 and Universal Analytics Tags in the GTM web container or in gtag.js. You can also send events directly with an HTTP request. You can find more instructions in Google’s documentation Send data to server-side Tag Manager.
Before starting to use the server-side container with a live production website, I strongly recommed you to consider if you have enough server capacity configured and the system scales properly. The default values for the context variables create a very small setup that cannot handle huge amounts of data!
Conclusions
If everything went as planned, you should now have your Google Tag Manager Server Container running in AWS! As previously mentioned, this is not a finalised setup and I strongly encourage you to consider fine-tuning the setup before using it in production. Especially monitoring, logging and alerts could be added.
I hope you find my AWS CDK template useful. I wanted to keep it to the minimum so that it would be easy to customize it to your own needs.
Thoughts on scalability
For small sites where the traffic doesn’t fluctuate too much, it’s not that important to spend time on scalability. The smallest instances with 0.25vCPU and 512MiB of memory are likely sufficient. It’s good to have at least 2-3 instances running all the time, but if you’re ok with losing a minute of data a couple of times a year, even a single instance setup can work.
For high-traffic sites, I recommend using at least 1024 (1 vCPU) instances. The 0,25 and 0,5 vCPU Fargate instances seem to have a lot higher latency than the bigger ones. This might have something to do with how containers that have less than 1 vCPU need to share CPU cores with other containers running on the same hardware (i.e. run in threads). When the container has a full CPU core to itself, it can better manage how computations are prioritized. With EC2 instances, the network bandwidth is also often lower with small instances, so there might be a similar characteristic in Fargate instances as well, even though there isn’t anything about it mentioned in the AWS documentation.
The auto-scaling can be configured to use also other metrics than CPU. Other relevant metrics to consider could be for example “request count per target”, “average target response time”, or “target response time p99”.
The request count might be a difficult metric since the number of requests a single server instance can handle may vary with the addition of more tags, variables, and other components in GTM. In other words, you would have to re-evaluate the auto-scaling limit periodically.
Target response time, either average or p99 would be a good metric to indicate end-user experience. A slower response time means that also the browser has to keep the connection open longer, which might spend device resources and slow down website performance.
It’s also possible to create custom metrics in AWS CloudWatch and use them with the ECS auto-scaling configurations. Whichever metrics are used, it’s important to determine the desired service-level objective (SLO) and which metrics best measure it.
Why deploy SGTM in AWS?
That’s a good question and there might be many reasons:
- Simplify corporate processes by using only one cloud vendor. If you are already using AWS, you probably have billing, monitoring, etc. set up.
- If you are a big customer with AWS, you might get bulk discounts.
- Use the same region and availability zones as the website(s) you’re tracking.
- Forward the events to AWS services: maybe you want to send data from your server-side GTM container to other AWS services. Using API Gateway you could send events to Lambda functions, Kinesis etc. You could even keep those APIs private so that they’re accessible only within the same VPC.
What would be your reason? I’m especially interested in the possibility of using other AWS services to process analytics events. I’m also workin on an idea on how to run a server-side GTM “serverless” with significantly lower cost. So stay tuned if you’re interested in reading more.